give answer in 2 step with explanation at the end of each step and final answer at the end:I T2 9. Consider the two-block system atop a frictionless horizontal =. — surface (no gravity) at right. k Bwsll F m m k (10p) Circle the number of its degrees of freedom: 0, 1, 2, 3 (5p) Circle the number of states needed to create a state space model: 2, 4, 6, 8 (10p) Complete its free-body diagram below. 2 a2 — —
Question:
give answer in 2 step with explanation at the end of each step and final answer at the end: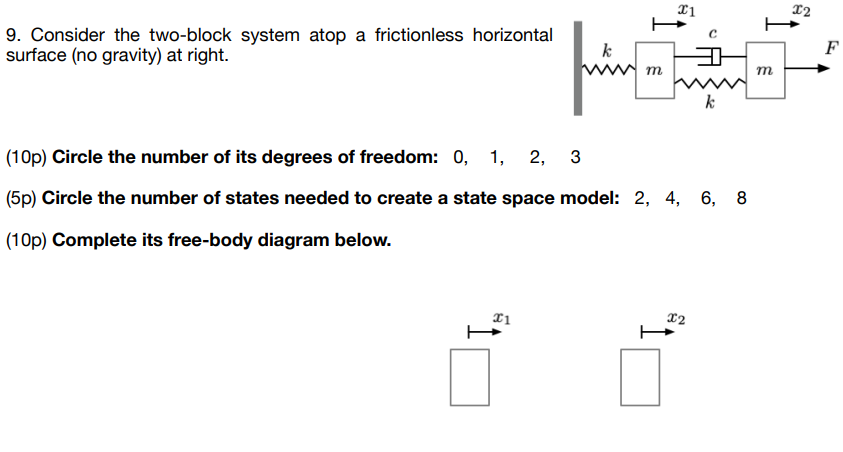 I T2
9. Consider the two-block system atop a frictionless horizontal =. —
surface (no gravity) at right. k Bwsll F
m m
k
(10p) Circle the number of its degrees of freedom: 0, 1, 2, 3
(5p) Circle the number of states needed to create a state space model: 2, 4, 6, 8
(10p) Complete its free-body diagram below.
2 a2
— —
I T2
9. Consider the two-block system atop a frictionless horizontal =. —
surface (no gravity) at right. k Bwsll F
m m
k
(10p) Circle the number of its degrees of freedom: 0, 1, 2, 3
(5p) Circle the number of states needed to create a state space model: 2, 4, 6, 8
(10p) Complete its free-body diagram below.
2 a2
— —
This is AI generated Response.
Asked by: Rahul
Created at: 2025-12-10 06:47:31
Asked by: Rahul
Created at: 2025-12-10 06:47:31
Final Answer:
Rendered
Raw Text
Did you like this answer?
## Step 1: Number of Degrees of Freedom
**Explanation:**
Each block can move independently along the horizontal axis. Let \( x_1 \) and \( x_2 \) be their respective positions. Since both positions can change independently (constrained only by springs/damper, not by each other), **the system has 2 degrees of freedom**.
> **Circle:** 2
> *Explanation: Each mass can move independently along the x-axis, giving us 2 independent coordinates.*
---
## Step 2: Number of States for State Space Model
**Explanation:**
For a state space model, each degree of freedom requires two states: position and velocity.
- For \( x_1 \): states are \( x_1 \) and \( \dot{x}_1 \)
- For \( x_2 \): states are \( x_2 \) and \( \dot{x}_2 \)
So, total states = \( 2 \times 2 = 4 \).
> **Circle:** 4
> *Explanation: Each of the 2 masses has a position and velocity, making 4 states total.*
---
## Step 3: Complete the Free-Body Diagram
Let's draw forces on each block:
### Block 1 (\( m \), position \( x_1 \)):
- **Spring force (left):** \( -k x_1 \) (restoring force from wall)
- **Spring force (right):** \( k(x_2 - x_1) \) (from middle spring, pulls toward \( x_2 \))
- **Damping force (damper):** \( c(\dot{x}_2 - \dot{x}_1) \) (from damper, proportional to relative velocity)
### Block 2 (\( m \), position \( x_2 \)):
- **Spring force (left):** \( -k(x_2 - x_1) \) (from middle spring, opposite to force on block 1)
- **Damping force (damper):** \( -c(\dot{x}_2 - \dot{x}_1) \) (opposite to force on block 1)
- **Spring force (right):** None (not attached to wall)
- **External force:** \( F \) (applied rightwards)
**Free-body diagram:**
```
Block 1 (x1): Block 2 (x2):
<--- [ -k x1 ] <--- [ -k(x2-x1) ]
<--- [ -c(ẋ2-ẋ1) ] <--- [ -c(ẋ2-ẋ1) ]
---> [ k(x2-x1) ] <--- [ -k(x2-x1) ]
---> [ c(ẋ2-ẋ1) ] <--- [ -c(ẋ2-ẋ1) ]
---> [ F ] (external)
```
Or, as vectors on the diagram:
- For Block 1 (\( x_1 \)):
- Left: \(-k x_1\)
- Right: \(k(x_2 - x_1) + c(\dot{x}_2 - \dot{x}_1)\)
- For Block 2 (\( x_2 \)):
- Left: \(-k(x_2 - x_1) - c(\dot{x}_2 - \dot{x}_1)\)
- Right: \(F\)
---
## **Final Answers**
1. **Degrees of freedom:** **2**
2. **Number of states:** **4**
3. **Free-body diagram:**
- **Block 1:** Forces from wall spring, middle spring, and damper.
- **Block 2:** Forces from middle spring, damper, and external force \( F \).
*(See explanation above for force directions and expressions.)*
📢 Instructions:
- Ask anything relatd to above question only.
- For new Question goto :